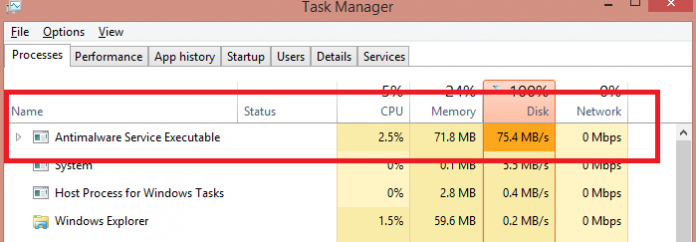
I tried to restart my PC few times hoping Antimalware service will stop on the next reboot But No even after restart Antimalware service keep running in my PC with the high disk usage
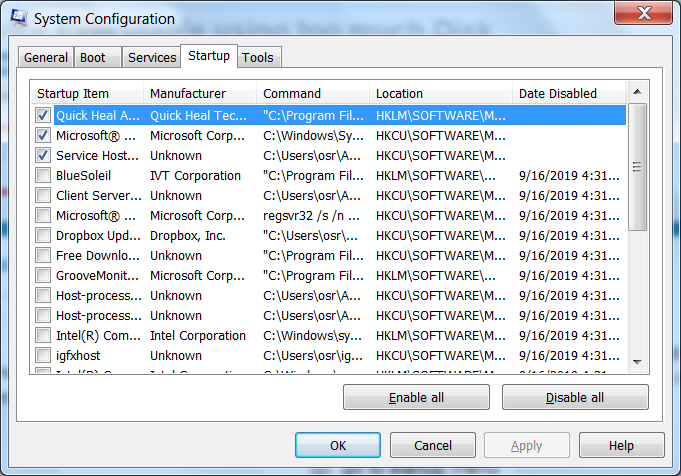
You can use msconfig command to stop this service.
Go to run menu,type msconfig click on ok
Start–>run–>msconfig–>ok
go to startup menu, and disable the program/service of Antimalware.
Note: if you are not able to do so,then you will have to go to the safemode and do the same process.
Good luck!!
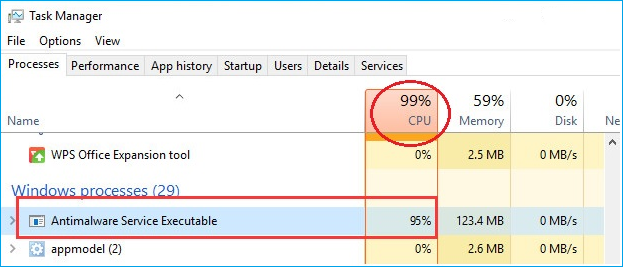
Antimalware Service Executable High CPU/Disk Usage
Windows 10 includes Windows Defender, Microsoft’s built-in antivirus. The Antimalware Service Executable process is Windows Defender’s background process. This program is also known as MsMpEng.exe and is part of the Windows operating system.
It’s responsible for checking files for malware when you access them, performing background system scans to check for dangerous software, installing antivirus definition updates, and anything else a security application like Windows Defender needs to do. That’s why it’s very likely to take up huge disk, memory, RAM and even network bandwidth, draining computer resources, especially after getting a Windows 10 update.
How Can I Fix Antimalware Service Executable High CPU/Disk Usage
If the Antimalware Sevice Executable process takes up high CPU on your Windows 10, don’t worry. We have easy solutions for you to deal with it.
Solution 1. Change Windows Defender’s Scheduling Options
Change Windows Defender’s schedule is an effective way because the error is mainly caused by real-time protection feature. Follow the details below and fix ‘antimalware service executable high disk usage’ issue.
Press the Windows logo key + R at the same time to invoke the Run box.
Type taskschd.msc and press Enter.
Double-click on Task Scheduler Library > Microsoft > Windows.
Double-click Windows Defender in Windows. Then double-click Windows Defender Scheduled Scan.
Uncheck Run with highest privileges.
Uncheck all the items in the Conditions section. Then click OK.
With the steps above, your error should be fixed now.
If unfortunately, it doesn’t help you, make sure to try the second solution below.
Solution 2. Add Antimalware Service Executable to Windows Defender’s Exclusion List
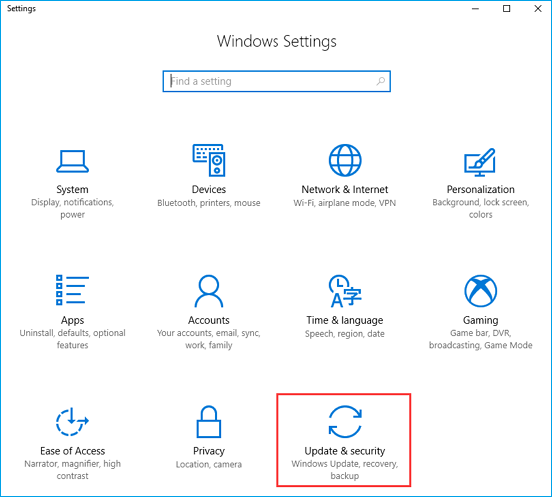
Press the Windows logo key + I at the same time to open the Settings window.
Click Update & security.
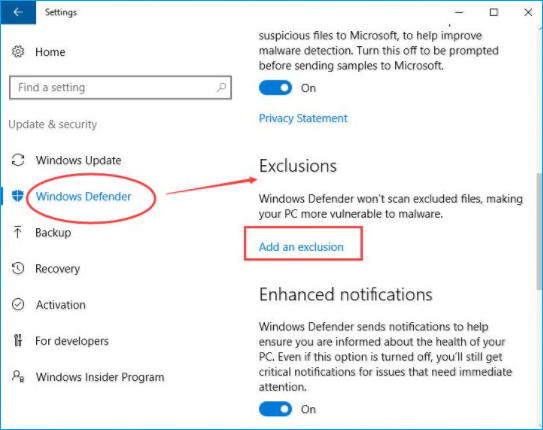
Click Windows Defender. Then click Add an exclusion in Exclusions.
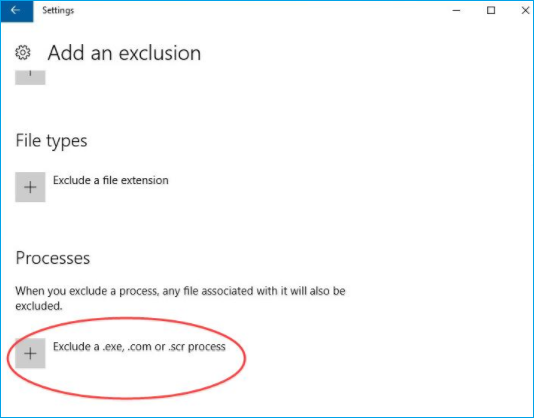
Click Exclude a .exe, .com or .scr process
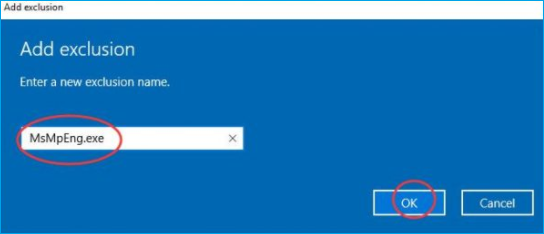
Type MsMpEng.exe. Then click OK.
Solution 3. Disable Windows Defender
Press Windows Key + R to open the Run Dialog Box.
In the Run Dialog Box, type regedit and click OK to open the Registry Editor.
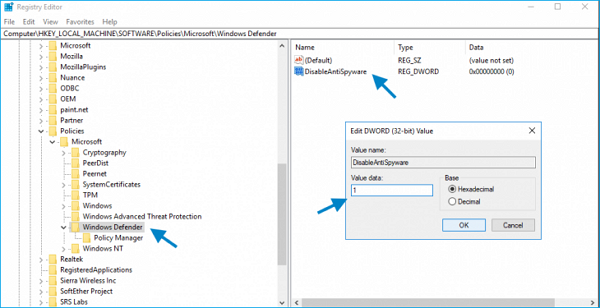
In the navigation pane on the left, double-click the folders to navigate to HKEY_LOCAL_MACHINE\SOFTWARE\Policies\Microsoft\Windows Defender.
If you find a registry entry named DisableAntiSpyware, double-click it and set its value data to 1.
Note: If you do not see a registry entry named DisableAntiSpyware, right-click in the main Registry Editor pane and select New > DWORD (32 bit) Value.
Name this new registry entry DisableAntiSpyware. Double click it and set its value data to 1.
When you access any files on your computer, Antimalware Service Executable is responsible for checking them for malware and performing a background system scan to check if the files you access contained any dangerous software. Additionally, it’s also responsible for installing antivirus definition updates, and doing anything else a security application like Windows Defender needs to do. Antimalware Service Executable scanning relies heavily on your computer’s CPU, that’s why you find Antimalware Service Executable taking high CPU usage and huge disk usage, memory usage, and sometimes it even took major network bandwidth and all of them cause draining computer your resources, especially you will see after getting a Windows 10 update. Simply by restarting your computer will cause stopping of this service and your PC will work normally.
This is one of the good services from Microsoft, which should not be disabled or recommended by Microsoft. Of course we have a workaround to solve if Antimalware Services Executable services are taking huge resources on your Windows 10 device.
Solution 1. Change Windows Defender’s Scheduling Options
Solution 2. Include Antimalware Service Executable to Windows Defender’s Exclusion List
Solution 3. Disable Windows Defender
Solution 4. Update Device Drivers
Any one of the above four solutions will help you to fix Antimalware Service Executable issues on your Windows 10 device. Disabling Windows Defender is not a good idea if you are not using any third party software because Windows Defender is a free and antimalware from Microsoft as a built-in tool to protect your computer from a kind of virus attack, but it has proven sometimes it can take most up your device resources. If you are using the latest versions of Windows 10 like Windows 10 1903 or Windows 10 1909 or Windows 10 2004 Windows Defender or Antimalware Service Executable won’t be a stubborn on your device so you may leave them enabled even if you are using any third-party antivirus software.
If none of the above solution helps you solve the Antimalware Service Executable issues on your Windows 10 device do let us know by commenting on this post so that we can help you sort this issue for you.
Above is the excellent suggetion by the fellow members in the forum to fix the antimalware service executable high disk error in Windows 10/11.
I believe the following suggest also adds a value and it could also help fix the msmpeng exe high disk usage error.
Adjust Windows Defender Schedule:
In Task Scheduler, modify Windows Defender’s settings by deselecting “Run with highest privileges” and unchecking all options under the Conditions section.
Exclude Antimalware Service Executable in Windows Defender:
Go to Update & Security > Windows Defender. In the Exclusions section, choose ‘Add an exclusion’, select ‘.exe, .com or .scr process’, and enter ‘MsMpEng.exe’.
Turn Off Windows Defender:
In Registry Editor, go to HKEY_LOCAL_MACHINE\SOFTWARE\ PoliciesMicrosoftWindows Defender. Add a new DWORD (32-bit) Value named DisableAntiSpyware, with the value set to 1.
Update Device Drivers:
Making your device drivers are up-to-date is another way to reduce this problem.
I hope the above suggestions will help the user fix the error
If your computer is running slow because of “Antimalware Service Executable” in Windows 10, here are some things you can try:
Check What’s Going On: Use a Process Explorer tool to see what “Antimalware Service Executable” is doing. This can help figure out why it’s using so much disk space.
Watch Disk Activity: Another tool called Windows Resource Monitor can show you what’s happening with your disk in real time. Watching disk activity might help determine which program or application is using your disk more than average.
Start Clean: Try doing a clean boot. Clean boot temporarily turns off extra programs and services that might be causing the problem. It helps determine if another program conflicts with “Antimalware Service Executable.”
Adjust Antivirus: You could also tell your program to ignore specific folders or processes (if you use a different antivirus). But bear in mind that, however you do it - you don’t want your computer to be unsecured.
Some other things to try:
Look at the settings in Windows Defender. There might be ways to change how often it scans your computer.
Think about using an antivirus program that does most of its work in the cloud. Antivirus might use up fewer resources on your computer.
If the problem has just started recently, try to restore your computer to an earlier stage.
Your computer should have the latest Windows updates. They fix the bugs and make it run your Windows device run without any issues.
Scan the system thoroughly for malware; use a good antivirus program.
If none of these things work, it may require help from a professional technician or the page on the Microsoft website.
Note that knowing your computer needs to be secure is quite vital if you are the one solving this problem. Please do your best to avoid turning off any critical security features until you are sure it is safe.
Scan your PC with comprehensive third-party antivirus software to determine whether other forms of malware are responsible for the high disk usage.
Optimise Disk Usage:
To do so, use Disk Cleanup, Defragment, and Optimise Drives, which are pre-installed tools in the Windows operating system.
Adjust Virtual Memory Settings:
One needs to work on adjusting the computer’s settings, specifically in terms of virtual memory, because the system may lack enough resources to perform the various processes appropriately.
Disable Superfetch and Prefetch:
They may sometimes result in high disk usage. In doing so, we should look at these services in the following manner. Deactivating them may enhance performance.
Upgrade Hardware:
If the latter is the case, try updating your equipment, for instance, by adding more RAM or installing an SSD.