I cannot see other computers in my network. My PC relies on Win 10, which does not show connected computers to me like it did at Win 7 or 8. Can someone help me out on how to find who is connected?
turn on network discovery, file and printer sharing under Home or Work and Public section in Advance sharing settings
Hi @Hamilton
Follow this navigation and enable the Network discovery
Control Panel\Network and Internet\Network and Sharing Center\Advanced sharing settings
Hello,
Check this-
n this article, I will walk through several settings and configurations you can check that would commonly cause My Network Places or Network to be empty in Windows.
File and Printer Sharing is turned off
Windows XP: If File and Printer Sharing is not turned on, you will never see another computer across the network. This protocol must be installed in order to be able browse the local network.
To enable File and Printer Sharing, go to the Control Panel , then Network Connections , right-click on Local Area Connection , and choose Properties .

On the General tab, make sure the following protocols are installed and checked:
- Client for Microsoft Networks
- File and Printer Sharing for Microsoft Networks
- Internet Protocol (TCP/IP)

If it’s not there, click the Install button and add the above protocols to the list and restart your computer. If these are installed correctly, then move on to the next check.
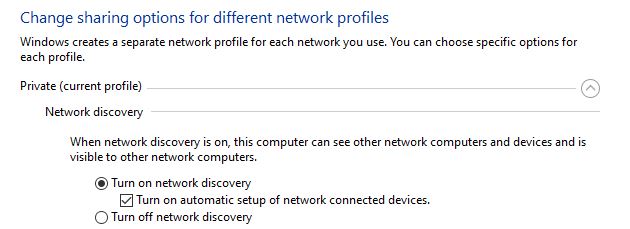
For Windows 7 and Windows 10, you need to go to Network and Sharing Center via the Control Panel. On the left-hand side, click on Change advanced sharing settings .
Now expand the Private profile option and make sure Network Discovery is turned on along with automatic setup. Make sure file and printer sharing is on and make sure to allow Windows to manage homegroup connections.
All Computers are in the same Workgroup or Homegroup
The second thing that needs to happen in order for another computer on the network to show up in your My Network Places list is that all the computers have to be in the same workgroup, domain or homegroup.
You can check this by right-clicking on My Computer , choosing Properties , and clicking on the Computer Name tab.

In Windows 7 and Windows 10, you have to right-click on Computer on the desktop, go to Properties , which will open the System Control Panel dialog. Here you need to click on Advanced System Settings .
Then click on the Computer Name tab. Next to Workgroup , you will see the workgroup name. Each computer on the network has to have exactly the same workgroup name in order to be able to see each other. You can click Change to change the name of the workgroup.
If you’re running newer versions of Windows, you may be using the homegroup feature. If that is the case, make sure all of the PCs are joined to the same homegroup. If you’re having issues with your homegroup, read my troubleshooting homegroups in Windows guide.
Allow File and Printer Sharing in Windows/3rd party Firewall
Once you have enabled File and Printer Sharing, you still may not be able to see other computers on the network if you have the Windows XP Firewall enabled.
By default, Windows does not allow the File and Printer Sharing service access through the firewall, so you have to manually allow access. You can do this by going to Control Panel, clicking on Windows Firewall and then clicking on the Exceptions tab.

Make sure to CHECK the box next to File and Printer Sharing. Now the service will be allowed access through the firewall and you will be able to see if in My Network Places. In Windows 7 and Windows 10, go to Windows Firewall and click on Allow an app or feature through the firewall . Make sure it is checked for only Private networks.
Note that if you have other firewall or Internet security software installed, it can also prevent Windows Networking features to function properly. One prime example of this is Norton Internet Security. You have to tell it which subnet to allow through the firewall or you have to uninstall it.
Check Computer Browser Service
Those this is rare, it could be that the Computer Browser service on your computer has been disabled. By default, it should be set to Manual (Trigger Start) and should be running. You can check the service by clicking on Start, typing in services.msc and pressing Enter.
If, for some reason, this is not the case, then you should go to the system configuration utility in Windows by clicking on Start and typing in MSCONFIG . Make sure that the Startup selection is set to Normal startup on the General tab.
If you see something like Selective startup , it could be that the service was disabled by someone at an earlier time.
Wireless Router Ports & Settings
A new feature on many routers is wireless isolation. It’s a security feature that prevents any wireless client from being able to see any other wireless client on the network. So the network appears to just be you and the default gateway.
It’s normally a setting in the wireless section on the web interface, but it could also be named something else like Enable Client Isolation . Make sure to check that setting if you are having the same issue on all of the computers on your network.
Ping Other Computers on the Network
One other simple thing to do is to check whether you can even ping the other computers on the network. If you can’t ping them, then that means that there is something wrong with the network connection itself.
You can ping another computer by going to Start , clicking on Run , and typing in CMD . In the command prompt, type in ping x.x.x.x or ping computername .

Switch between Static and DHCP IP address
Another way to try and solve this issue is to switch the computer over to a static IP address and then switch it back to DHCP. When you switch like that, the TCP/IP configuration is reset and any corrupted IP settings like the subnet mask, etc. are fixed.
You can do this by right-clicking on Local Area Connection , choosing Properties , and then selecting the Internet Protocol (TCP/IP) entry and choosing Properties .

Then click Use the following IP address and type in an IP address that would work on your current network. Also choose Use the following DNS server addresses and type in the IP address of your router.
Click OK and then OK again. After that, go back to that screen and choose Obtain and IP Address automatically for both and click OK.

This should hopefully fix any problems you are having with not being able to browse computers on your network. If this didn’t fix your problem, post a comment and I’ll try to help! Enjoy!