Hi,
We have a common PC in our cafeteria which was in Windows 7 and had auto login feature on it. When every the PC start it will automatically login and newer ask for username or password. Now we have upgraded the PC from Windows 7 to Windows 10 1909 version.
Now I need a way to disable login request on system startup and enable auto login but so far I wasn’t able to find the option in Windows 10 setting page or classic control panel.
I am aware about security, any setup shouldn’t be left for autologin but this is due to our management requirement which we cannot ignore and anyhow this PC doesn’t hold any confidential data.
Thanks for the read I hope someone could help me solve this.
2 Likes
Disabling login feature in Windows can lead to a security risk. If you set a computer for auto logon anyone who can present physically in front of this computer can gain full access to this computer despite their credential to use it.
There is a registry file in Windows 10 using this you can bypass the login in windows 10. when auto logon is turned on, the password is stored in the registry in plain text. The specific registry key that stores this value can be remotely read by the Authenticated Users group. This setting is recommended only for cases in which the computer is physically secured and steps have been taken to make sure that untrusted users cannot remotely access the registry.
To use Registry Editor to turn on automatic logon, follow these steps:
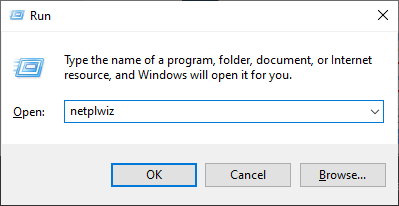
- Click Start , and then click Run .
- In the Open box, type Regedt32.exe, and then press Enter.
- Locate the following subkey in the registry:
HKEY_LOCAL_MACHINE\SOFTWARE\Microsoft\Windows NT\CurrentVersion\Winlogon
- Double-click the DefaultUserName entry, type your user name, and then click OK .
- Double-click the DefaultPassword entry, type your password, and then click OK .
Note If the DefaultPassword value does not exist, it must be added. To add the value, follow these steps:
-
On the Edit menu, click New , and then point to String Value .
-
Type DefaultPassword, and then press Enter.
-
Double-click DefaultPassword .
-
In the Edit String dialog, type your password and then click OK .Note If no DefaultPassword string is specified, Windows automatically changes the value of the AutoAdminLogon key from 1 (true) to 0 (false), disabling the AutoAdminLogon feature.
-
On the Edit menu, click New , and then point to String Value .
-
Type AutoAdminLogon , and then press Enter.
-
Double-click AutoAdminLogon .
-
In the Edit String dialog box, type 1 and then click OK .
-
If you have joined the computer to a domain, you should add the DefaultDomain value, and the data for the value should be set as the fully qualified domain name (FQDN) of the domain.
-
Exit Registry Editor.
-
Click Start , click Shutdown , and then type a reason in the Comment text box.
-
Click OK to turn off your computer.
-
Restart your computer. You can now log on automatically.
2 Likes
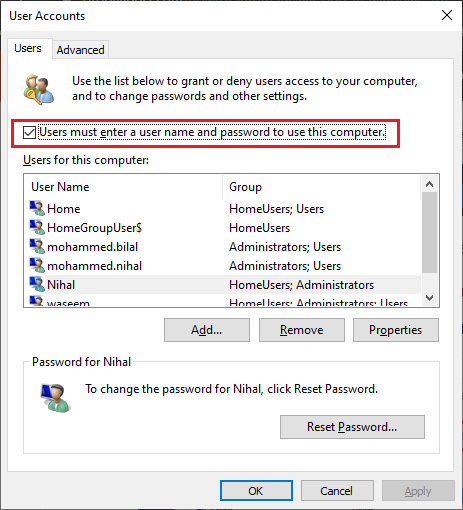
Press WinKey + R to open the Run dialog and type netplwiz
In the User Accounts screen Un-tick the Users must enter a user name and password to use this computer.
After sucessfully changing this setting restart your PC to take effect. After the restart your PC will bypass the Windows login screen.