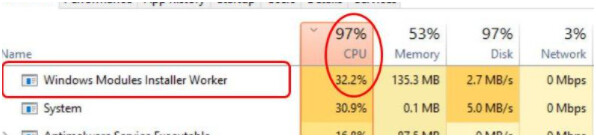
Are you familiar with the scenario in the above screenshot? This means that the Windows Module Installer Worker is using a large portion of the CPU. This is quite a common problem and many users face it, much to their frustration.
In order to help people solve it, two solutions are put together. Hopefully, these solutions will help you get around this problem.
What is Windows Modules Installer worker?
The Windows Modules Installer worker is a service that searches for new updates and installs them. In essence, when your computer system is looking for updates to install, this program will be running in the background.
What to do when the Windows Modules Installer Worker is using high CPU power?
Below, we have listed two solutions that can help you if you are facing this issue. These two solutions don’t have to be used together or one after the other. If the first solution works, then you don’t have to bother with the rest.
We are also listing an additional tip that you can use if both methods don’t work. It should be kept in mind that these methods will enable Windows Automatic update on your system.
Solution One: Stop and turn off the Windows Update Service
First of all, disable the Windows Update Service. The Windows Modules Installer Worker will only run in the background if your system is looking for updates to install. If you nip the evil in the bud and just turn off the Windows Update Service, then the Windows Modules Installer will not have any reason to run which will not lead to the high CPU consumption error.
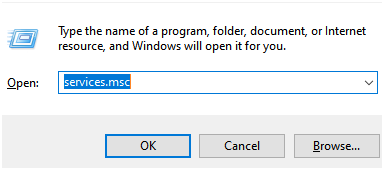
By following these simple steps, you can turn off the Windows Update Service.
-
Launch the Run Box by using the Windows Key + R shortcut.
-
Type in services.msc and press OK.
-
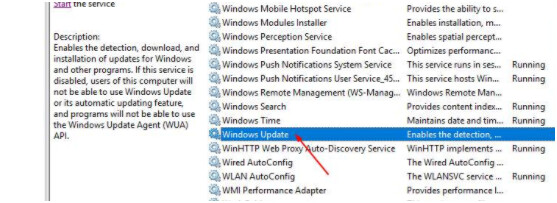
The Services window will open. Double click on Windows Update.
-
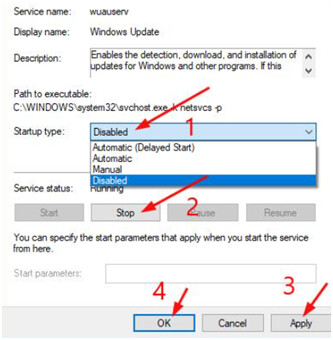
Set its startup type to be Disabled. Then press Stop. Then apply these settings.
-
Once you have done this, your CPU usage should revert back to its normal level.
Solution Two: Change the internet settings
You can also stop Windows Update Service by setting your internet configuration to Metered Settings. Hence, you will limit the amount of data used by your system which will also stop your computer from automatically updating.
This can also stop the Windows Modules Installer Worker from using up a large percentage of your CPU.
There are two scenarios in this method.
- The first case is that you are using Wi-Fi
- The other case is that you are using an Ethernet Network
The first scenario: Wi-Fi
-
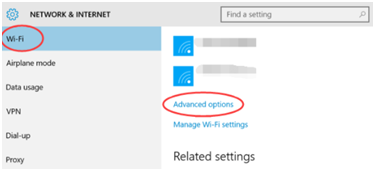
Open up the Start menu. Go to Settings. Then go to Network and Internet and then select Wi-Fi. Then go to Advanced Options.
-
Check the ‘Set as Metered Connection’.

See if you are still facing the problem.
The Second Scenario: You are using an Ethernet connection
-
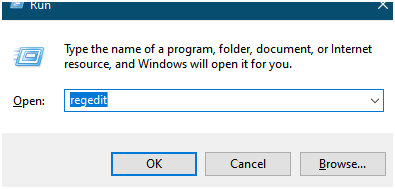
Launch the run box by using the Windows Key and R shortcut.
-
Type in ‘regedit’ and confirm
-
Press OK when you are given the prompt.
-
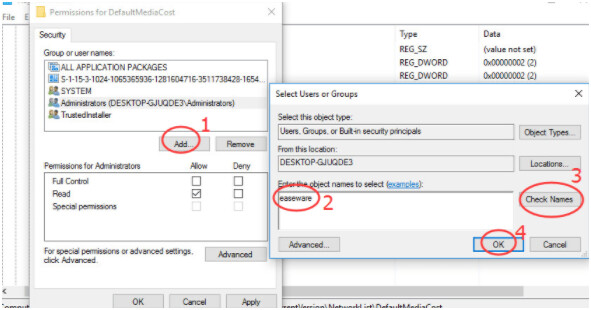
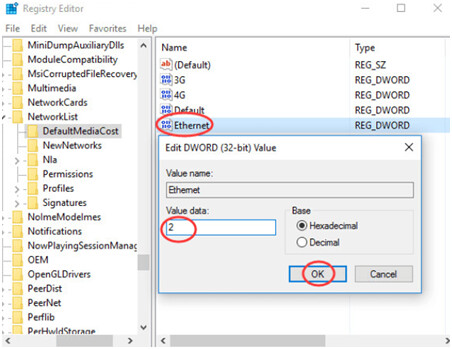
A window will open. Navigate to HKEY_LOCAL_MACHINE. Then go to SOFTWARE. Then select Microsoft and go to Windows NT. Go to Current Version and then go to Network List. Then select DefaultMediaCost. Press right-click on this option and select Permissions.

-
Press Add and then enter your Username into ‘Enter the Object Name to Select’. Then press Check Names and then click OK.
-
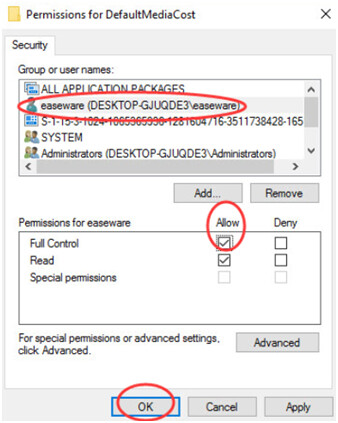
Select the user you have added in the last step. Give full permission for Full Control by ticking the Allow button in front of it.
-
Double-click on the Ethernet option and configure the value data to be 2. Press OK and close the editor window.
-
Restart your system.
The problem should be solved.