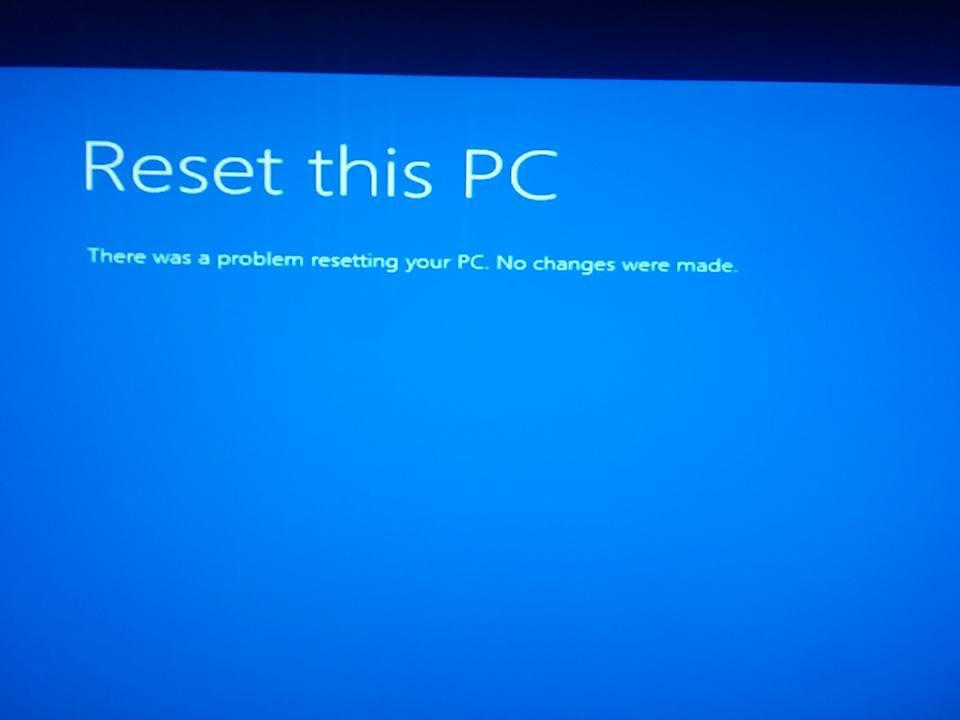
8 Solutions to fix ‘There Was a Problem Resetting your PC’ Windows 10 BSOD error
Solution 1 Conduct a SFC (System File Check) Scan
It is a common idea of most users that this problem is due to the presence of corrupted files. But luckily, this issue can be easily solved using a straight-forward SFC scan. Following are the steps you need to follow to do so:
-
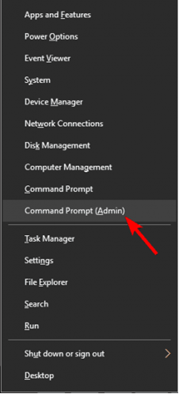
Press the ‘Windows Key’ and ‘X’ to get the Win + X menu. Now, from the list you see before you, choose Command Prompt. Don’t worry if you can’t see the option. Use Powershell instead.
-
When you get the Common Prompt menu, input sfc /scannow
-
The scan will now begin. The SFC scan takes up a maximum of 20 minutes to finish. Don’t abort it.
If your problem ‘There Was a Problem Resetting your PC’ is not solved with the scan, or you have some issues with running the scan in the first place, don’t worry. You can use the DISM scan instead.
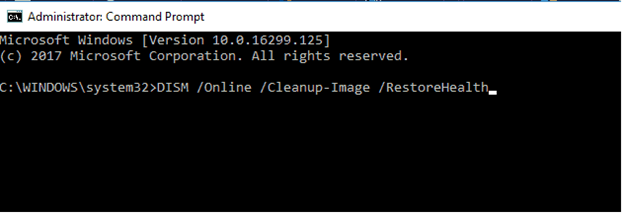
In order to run the DISM scan, you have to again load the command prompt as admin and input the following command: DISM / Online/ Cleanup-image/ RestoreHealth
Unlike the SFC scan, the DISM might take more than just 20 minutes. Don’t stop it.
If you are still facing the ‘There Was a Problem Resetting your PC’ problem after the DISM scan, the go for the SFC scan again.
In spite of this, you are unable to reset your Windows, then use the following commands by typing them out and pressing Enter after each.
- cd %windir%system32config
- ren system system.001
- ren software software.001
Solution 2 Make use of a boot-up USB stick or CD
- Go to the Microsoft website and download the installation files. Use these files to make a boot-up CD or USB.
- Put the CD or the USB. Then select RESET.
- You will be shown some guidelines on the screen. Follow them to reset your Windows.
Resetting your Windows 10 PC will help you get rid of ‘There Was a Problem Resetting your PC’ error.
Solution 3 Perform a System Restore
In the events where the issue is repeated continuously, then one way out of it can be to conduct a system restore.
For those who don’t know, System Restore is used to reinstitute your PC to an older stage. In doing so, many problems are resolved.
Performing a System Restore is not that difficult. You can follow the following steps to do so:
-
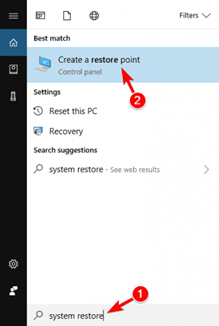
Use Windows Key + S and search for ‘System Restore’. From the menu you see there, select ‘Create a restore point’.
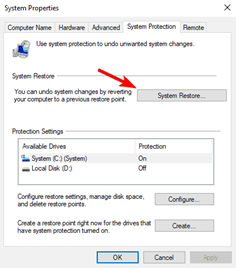
- You will now see the System Properties window. From there, select System Restore.
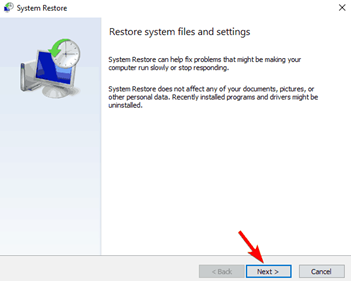
- Once the window opens, select Next.
-
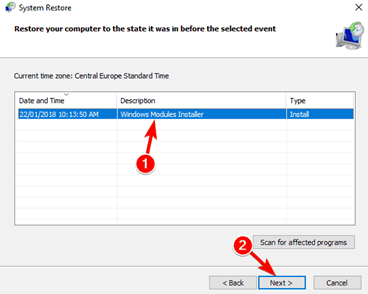
If it is available, then click Show more restore points. You can now see the various points/stages from where you can restore your PC to. Click the one you want and press Next.
- You will be shown some instructions. Follow these to finish the System Restore.
When your system is restored, you should not be facing the problem anymore.
If you can’t find any restore points, then follow these instructions: Control Panel–>Search and select ‘RECOVERY’–>Configure System Restore–>’Configure’–>Turn on the option of System Protection.
Then you will see that the option is enabled.
Solution 4 Disable reagentc
It is another popular opinion that you can resolve the There was a problem resetting your PC problem by momentarily turning off reagentc. It can be done easily by following these simple instructions.
- Open up Command Prompt as admin
- Input these commands
- reagentc /disable
- reagentc /enable
- Once you have run these commands, attempt to reset your PC.
Solution 5 Try doing the System File Checker scan outside Windows
It has also been reported by users that doing the SFC scan outside Windows is also a good way of getting rid of the There was a problem resetting your PC error. Here’s how to do it:
- Get to the Start Menu and the press the power icon. Now click on Restart while holding down the Shift key.
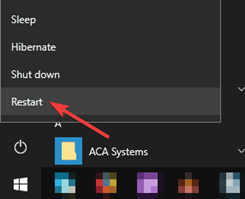
- Once you have done that, a list will appear. First press on troubleshoot, then go to Advanced Options and then go to the Command Prompt
- Now you have to run a code: wmic logicaldisk get deviceid, volumename, description
- You will be shown a collection of local drives. Here, you have to look for your system drive. In normal circumstances, it will be D outside of the Windows. Then you have to run this command: sfc /scannow /offbootdir=d: /offwindir=d:Windows. You should check and see if it is D for you. Usually, it is D.
The scan will then commence. Don’t stop it. Once it is done, see if you are still facing the problem.
Solution 6 Try running the DISM scan outside Windows
This issues can sometimes be solved by running the DISM scan out of the Windows. However, if you want to do that, you must create Windows 10 installation media.
You can create installation media by making use of the Media Creation Tool. Once you have done that, connect the installation media to your computer and do the following:
- Turn on your system from the installation media.
- Pick your wanted language
- In the bottom left corner, you will see an option Repair Your Computer. Click on that.
- After that, select Trouble shoot. From there, go to Advanced Options and open up the Command prompt.
- Use this command: dism /get-wiminf /wimfile:E:sourcesinstall.esd. Once you have run this command, the system images on your installation media should be visible to you. If not, attempt the code with a different letter than ‘E’ to access the image.
- After that, run this command: mkdir d:scratch.
- After that, run this command: dism /image:d /cleanup-image /restorehealth /source:esd:e:sourcesinstall.esd:2 /scratchdir:d:scratch /limitaccess
If you have done everything correctly, the scan should start and fix your files.
See if the issue is still there after the whole process. This is a bit more complex method than others so try and follow the instructions carefully.
Solution 7 Use Windows Defender to refresh the Windows
Another method of resolving the ‘There was a problem resetting your PC’ is to use the Windows Defender to refresh the Windows. Here is how to do it:
- Use Windows + I to go to the Settings app.
- Next, go to ‘Update and Security’

- After that, select Windows Defender. Select the Open Windows Defender Security Center.

- After that, choose Device Performance and Health

-
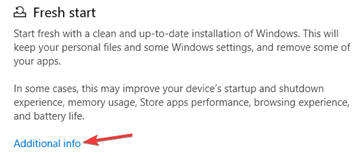
When you see the Fresh Start Section, select Additional Info
-
Once you have done that, click on ‘Get Started’.
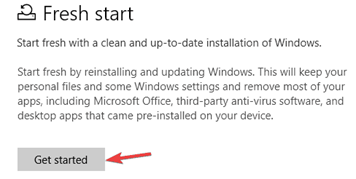
You will then be shown some guidelines. Follow them to refresh your computer system. Bear in mind that doing so will remove a lot of files from your drive, so before doing all this back up your data first.
Solution 8 Do a clean install
If the problem is persisting and you keep getting the error over and over again, the only way out for you might be do perform a clean install. You will have to create an installation media first. To do that, use the Media Creation Tool.
Once you have done that, open up your computer from the installation media. Choose your system drive.
You will be shown some instructions. Follow them and finish the installation. Once it is done, you will have a new and fresh installation of Windows 10. The issue should be resolved.
If you feel inclined to save your files, you can perform a back-up using the Windows.old directory.
There were some of the solutions of getting rid of the There was a problem resetting your PC error.
