Let’s Encrypt is an open source non-profit certificate authority and easy for everyone to install SSL certificates. I will try to guide you about WP SSL certificates and tell you why you may want one on your site?
Secure Socket Layer (SSL) is the standard for encrypted communication between web servers and web browsers
When a site is secure with any SSL certificate, a padlock icon is visible in the address bar and the URL prefix changes from http:// to https://
Every website is issued with a unique SSL certificate for its identification purposes. There are 3 types of certificates that indicates the level of trust by the user in the SSL negotiation
-
Domain Validated Certificate
-
Organization Validation Certificate
-
Extended Validation Certificate
How to Install a Free SSL Certificate From Let’s Encrypt
Let’s Encrypt is a certificate authority that has hugely simplified installing an SSL certificate. Let’s Encrypt offers free, automated certificates for everyone giving them what they need to enable HTTPS on their websites.
Step 1: Install Your Free SSL Certificate
If your hosting provider offers free SSL certificates from Let’s Encrypt then you can easily install it from within your hosting account.
Start out by logging into your hosting account. Next, head over to SSL > Add Certificate > Let’s Encrypt certificate . The exact names for each section and page may be different though the process remains the same. Once you’re there, select the domain you want to install the SSL certificate to and save changes.
If your hosting provider doesn’t offer free SSL certificate installation then you can modify the .htacess file directly. Open the file in a file editor and add the following lines of code to it:
RewriteEngine On
RewriteCond%{SERVER_PORT} 80
RewriteRule ^(.*)$ https://yourdomain.com/$1 [R,L]
Let’s Encrypt’s official documentation has a detailed account of how you can install an SSL certificate to your site manually. If the steps outlined above don’t work for you then you can always do it yourself.
Step 2: Update Your WordPress URLs
Once you took the initial step, from a technical viewpoint, your site is using HTTPS. To get maximum benefit out of it, you need to change the URLs of your Word Press site. This is to ensure that the traffic doesn’t keep going back and forth between the insecure and secure link. So it’s important to inform your browser about the changes you have made to the domain.
If you have a new WordPress website then all you have to do is change the URLs from your site’s settings page.
-
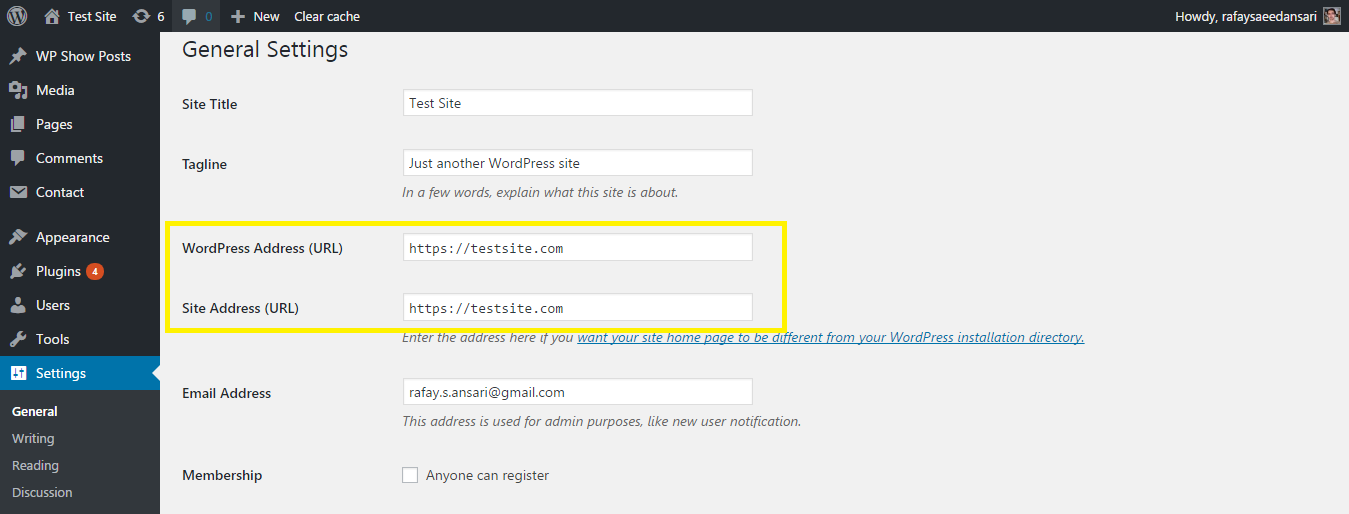
Go to the General Settings menu from your WordPress admin panel by navigating to Settings > General .
-
Scroll down to WordPress Address URL and Site Address URL .
-
Update fields by replacing HTTP with HTTPS in both text boxes.
On the other hand, if your website is already being indexed by search engines then you’ll have to update the URLs by installing a plugin. We recommend going with the [Really Simple SSL] plugin because you don’t have to configure any settings – once you’ve activated it, it’ll update your WordPress site’s URLs automatically.
If you are having a problem with updating the URL of your WordPress sites head over to the for more information.
Step 3: Update Your Google Analytics Settings
Google analytical tool that allows you to monitor your traffic and lets you manage the site related progress and problems. So that, if you use it then you’ll have to update your site’s URL from Google Analytics’ Property Settings.
Start off by logging into your Google Analytics account. From the dashboard, head over to Admin and click on Property Settings . Next, click on http:// and choose https// . Finally, click the Save button at the bottom of the page to update the settings.
Sucuri and SSL
Sucuri is a website security platform that offers a suite of tools designed to help website owners protect their sites from attacks and clean up hacked sites. By using their products and Sucuri Platform you can optimize your website for performance, detect malware, leverage DDoS mitigation, and much more.
On top of all of this, Sucuri has partnered with Let’s Encrypt to provide free SSL certificates to all customers using Sucuri Firewall. The one-click SSL certificate installation is incredibly easy to follow and allows users to get up and running with the HTTPS protocol in ten minutes. In addition, by opting for Sucuri Firewall, you get access to neat features like performance optimization, DDoS mitigation, and stop hackers, in addition to a free SSL certificate.