I just found out that WUDownloadCache folder is a location for Win10 updates on a PC. Now, since update was finished, I am wondering whether it would be ok for it to be deleted permanently? Can I configure Windows to move it to C:\temp? I want to bring my OS to 1909 so was wondering how can I get this organised.
5 Likes
Hello @Brad Welcome to community ![]()
Whenever you update your system, windows will automatically cache all the Windows update installation files. using this folder’s files, windows can reapply updates without downloading updates again. Once you update your windows successfully, you can delete the folder’s files and regain the space.
but you can not delete this folder normally, as you delete other folders, so if you want to delete the files of this folder, you will have to stop “windows update” service.
step 1 stop “windows update” service
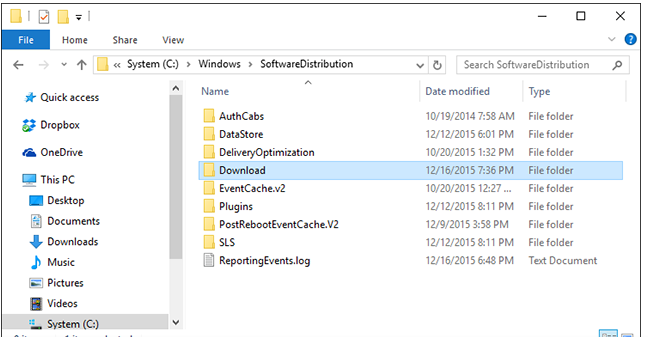
step 2 go to c:\windows\softwareDistribution\download
select all files and delete all files.
step 3 start windows update service again
3 Likes
Hi @Brad,
Yes, It should be fine to remove the ‘WUDownloadcache’ its just a cache folder nothing more.
1 Like
As others have already said you can safely delete it. In fact, clearing the Windows update cache can help you regain that lost hard drive space. Moreover, clearing the update cache also helps in situations where the update files are corrupted.
Here is how you can clear the Windows update cache in Windows 10.
Clear Update Cache in Windows 10
Clearing the update cache in Windows is easy, but not as straightforward as it should be. Though we can use the Disk Cleanup Utility, it may not clear the update cache completely, so we are going to use the manual method.
To start, we need to stop the Windows update service before we can clear the update cache. To do that, search for “Services” in the Start menu and open it. If you are using your system as a standard user, then open it as an administrator using the right-click menu.

Once the Services window has been opened, find the service “Windows Update,” right-click on it and then select the option “Stop.” This action stops the Windows update service.

After stopping the service, press “Win + R,” enter the below path and press the Enter button. This is the folder where Windows stores all the files related to Windows updates.
C:\Windows\SoftwareDistribution\

Once you are in this folder, open the “Download” folder, select all the files in it and just press the Delete key on your keyboard to delete all the files. You might be prompted for administrator permissions; simply click on the “Continue” button to complete the procedure.

If you want to gain some more space, you can also delete the files inside the “DeliveryOptimization” folder. Before you can do that, you need to disable the Windows Delivery Optimization feature. To do that, search for “Check for Updates” in the Start menu and open it.

In the “Update and Security” window, click on the “Advanced Options” link in the Windows Update page.

Once the Advanced Options window has been opened, click on the “Choose how updates are delivered” link.

The above action will take you to the Delivery Optimization settings window. Here, toggle the button to turn off the Windows Delivery Optimization feature.

After turning off the Delivery Optimization feature, press “Win + R,” enter the below folder path and press the Enter button.
C:\Windows\SoftwareDistribution\DeliveryOptimization

Here in this folder, select all the files and folders using the keyboard shortcut “Ctrl + A” and press the Delete key on your keyboard. This action deletes all the files in the folder.

If you want to, you can check the size of all those files and folders by right-clicking and selecting the option “Properties.” In my case, the files and folders in the Delivery Optimization folder amount to nearly 7Gb.

Once you are done with everything, go back to the Services window, right-click on the “Windows Update” service and select the option “Start.” This action starts the service if it hasn’t already.

It is that simple to clear the update cache in Windows 10. Do comment below sharing your thoughts and experiences about using the above method to clear the update cache.
credit:maketecheasier.com
6 Likes
Hi @Brad,
The download history is located in the C:\Windows\SoftwareDistribution\DataStore folder. If you clean that folder (empty it) or rename it (it’ll be recreated), you’ll just lose the ability to see via the Windows Update panel what updates you installed. You won’t have to re-download any of them because Windows still knows which updates are installed and which aren’t. As for the Download folder, it’ll only force Windows to re-download the updates that were pending for an install, which is a good thing because often updates that stays in that folder for too long will have their file corrupted or disappear and the update won’t be able to install.
In other words, there’s nothing wrong in deleting the content of renaming the Download and DataStore folders. It’s often done for Windows Update troubleshooting.
2 Likes
You may delete the WUDownloadCache folder , the folder’s entire purpose is to store cached information during long updates to utilize other storage devices in order to cache the items in the WUDownloadCache folder to speed up the update process, but yes - deleting this folder will absolutely not harm your system no matter the size of the folder or it’s file contents , this file is also automatically generated on all NT platforms, including RT, just to speed up the updating process, but if UAC says “You may not have access to this folder,” UAC meaning (User Account Control), that is a signal that WUCache -for short - is storing timestamped information that is crucial to the Windows update system of the NT and RT platform. The “Recent” folder is brought on from Windows’ “Quick Access” feature in the Windows File Explorer, and is used to bring you quickly to your most used destinations, too. The “Recent” folder may never* be deleted.

2 Likes
Hello
Of course you can delete and use all ways which our members advice you, there is one thing i think it will be good to know for you
The download history is located in the C:\Windows\SoftwareDistribution\DataStore folder. If you clean that folder (empty it) or rename it (it’ll be recreated), you’ll just lose the ability to see via the Windows Update panel what updates you installed. You won’t have to re-download any of them because Windows still knows which updates are installed and which aren’t. As for the Download folder, it’ll only force Windows to re-download the updates that were pending for an install, which is a good thing because often updates that stays in that folder for too long will have their file corrupted or dissapear and the update won’t be able to install.
In other words, there’s nothing wrong in deleting the content of renaming the Download and DataStore folders. It’s often done for Windows Update troubleshooting.
1 Like
The update itself is great, but it uses up to 24 GB of cache space and doesn’t automatically clear itself after the update is applied. Imagine what you could do with all of that extra space!
Before we can delete these files, we have to disable Windows Update to make sure no updates are currently downloading. To do this, open the Start Menu , launch the Command Prompt app, and type:
net stop wuauserv
Next, open File Explorer and navigate to C:\Windows\SoftwareDistribution\Download . Inside the Download folder, you can safely delete everything. Afterwards, you should re-enable Windows Update by typing the following into Command Prompt:
net start wuauserv
3 Likes
Thanks @Mr.Robot. I had this exact problem your instruction helped me solve the problem.
Thanks
1 Like
Hi @Brad,
If you are using Windows 10 1903 or later version of Windows 10. Then you can use Storage Sense feature which can automatically clean up all the temporary, windows update leftovers, and cache files. Storage sense is very effective and even it can run when your PC is on low disk space. In the Windows 10 version 1909 and Windows 10 version 2004 Storage sense has lot improved. So, I would strongly suggest you to use Storage sense on your PC to avoid unnecessary files fulling your disk. By default Storage sense is disabled on the PC, you have to enable it manually or through group policy or registry.
Please check this below topic to enable storage sense for your PC.
Hope this helps
As discussion above the WUDownloadCache folder can be deleted. I would like to add some addtional additional tips to this conversation to make it more meaningful.
- Only delete the contents of the WUDownloadCache folder if you are experiencing problems with Windows Update. Deleting the contents of this folder can sometimes cause problems with Windows Update, so it is best to only do so as a last resort.
- If you are experiencing problems with Windows Update, you can try restarting your computer or running the Windows Update troubleshooter. These steps may resolve the issue without the need to delete the contents of the WUDownloadCache folder.
- If you are still having problems with Windows Update, you can contact Microsoft support for assistance. They may be able to help you resolve the issue or provide additional troubleshooting steps.
1 Like
Here are some additional points that the forum members may have missed:
- The wudownloadcache folder can be located in different locations on different versions of Windows. To find the location of the wudownloadcache folder on your computer, you can use the following command in a Command Prompt window:
wmic product get InstallLocation
This will list all of the installed products on your computer, including the location of the wudownloadcache folder for each product.
If you are having problems with Windows Update, you can try to rename the wudownloadcache folder instead of deleting it. This will force Windows Update to recreate the folder and download the updates again. To rename the wudownloadcache folder, follow these steps:
- Open File Explorer.
- Navigate to the location of the wudownloadcache folder.
- Right-click on the wudownloadcache folder and select “Rename”.
- Enter a new name for the folder, such as “wudownloadcache.old”.
- Click “Enter”.
Check if you are still having the same error with Windows Update after renaming the wudownloadcache folder, you can try to create a new wudownloadcache folder. To do this, follow these steps:
- Open File Explorer.
- Navigate to the location where you want to create the new wudownloadcache folder.
- Right-click in the empty space and select “New” > “Folder”.
- Enter “wudownloadcache” as the name of the new folder.
- Click “Enter”.
I hope this information is helpful. ![]()
Recommendations and useful information
Here are some additional recommendations and valuable information for users who are considering deleting the “wudownloadcache” folder in Windows 10 or Windows 11 device:
- After deleting the “wudownloadcache” folder, consider restarting your computer to prompt Windows Update to recreate the folder.
- If issues persist with Windows Update post-deletion, try running the Windows Update troubleshooter or resetting Windows Update components.
- If unsure about deleting the “wudownloadcache” folder, it is advisable to seek guidance from a qualified IT professional to make an informed decision.
- The “wudownloadcache” folder is typically situated on the C: drive, though its location may vary if you have altered the default installation path for Windows.
- If you utilize a third-party antivirus program, it might hinder the deletion of the “wudownloadcache” folder. In such instances, temporarily disable your antivirus program before attempting to delete the folder.
- If issues with Windows Update persist even after removing the “wudownloadcache” folder, you might need to reset Windows Update components or employ the DISM tool to scan and repair Windows system files.
I hope this helps
Hi everyone,
I’ve been following the discussion about deleting the WUDownloadCache folder and understand the frustration with Windows Update issues. While deleting this folder can sometimes be a solution, it’s crucial to approach it with caution as a last resort. Here’s a breakdown:
Before You Delete:
- Look for other options: Try restarting your computer and running the Windows Update troubleshooter first. These fixes often work without needing to touch the WUDownloadCache.
- Back up the folder: If you decide to delete it, always back it if you need to restore it later.
Deletion Process:
- Locate the folder: It’s usually at C:\Windows\SoftwareDistribution\Download, but use the wmic product get InstallLocation command if unsure.
- Navigate carefully: Open File Explorer and head to the location.
- Back up again (optional but recommended): Make a copy of the folder in another location.
- Right-click the folder and choose “Delete.”
- Restart your computer: To make Windows Update, download any required files; you can delete the folder and then prompt it to recreate it. Restart will ensure that the necessary files are downloaded.
Troubleshooting Tips:
- Renaming instead of deleting: If Windows Update still acts up, try renaming the folder. This forces Windows Update to download everything again, sometimes resolving the issue.
- Reset Windows Update components or use DISM: These built-in tools can fix underlying problems with Windows Update. Search online for detailed instructions.